Showing posts with label pretend. Show all posts

Tuesday, February 12, 2013

Diy play birthday cake

DIY Play Cake


I've made several different play foods out of felt for my kiddos to play with, but the one thing they needed most was a cake. They are always throwing birthday parties for each other and what not, and I wanted to make one for them.  

I made one myself out of only felt. . . well. . . it didnt hold shape, so as i looked online for how to fix it (and i did, ill post it later hopefully) I found this tutorial here at she wears flowers for one using a hat box. I loved the idea of one with storage for decorations, but didnt have a hat box, or the metal for the outside of it, but to my surprise while searching my craft pile, i found this old cookie tin and thought YES same idea, minus having to cut metal!!


The idea:  wrap the tin in felt to look like a cake, make felt decorations that can store inside it, add magnets to the decorations and they stick on the cake. . . awesome, right!!

First, cover the cake! I wanted it to be chocolate, so  found a nice brown and cut a strip (or two) the same width as the depth of the tin, sewed them together to the right circumference (to fit snug) 


Next, turn this brown circle inside right, and slip over the tin.
Important:  The tin needs to close, so make sure you leave the space at the top that the lids comes down to uncovered.  Extra will hang over bottom.


Wrap that extra around the bottom and hot glue it in place


Next cut a circle a bit bigger than the lid, and hot glue it on so it touches the rim 


mine was a little short but thats ok, im adding a ruffle 


 I saw instructions for making the felt ruffle HERE (she wears flowers)

after making the ruffle, (well several sewed together long enough to go around) I glued it on the rim of the lid like so:
I made sure it hung over a little that way it would cover up any gap i may have had in the felt
see how cute!! 


 I liked the ruffle so much i decided to make another for the bottom of the cake too, to more resemble the piped decorative icing on a real cake.


Bottom and top of cake 


And then what the kids loved best. . . the decorations!!

For the candles theres a better turorial here.
I just cut the little flame shapes out of red and yellow felt and glued them together with hot glue, then took a 2" square and rolled it up, glued the end to together, glued flame atop, and a round magnet on bottom :)


felt sticks to felt, so i cut random shapes out for them to stick on the cake


i made theses flowers of felt and glued a magnet on bottom


see, here is a cute cake to have with tea, 


and here is a birthday cake for all their parties!!


 and what i like best. . . all decorations store inside !!


Wednesday, January 2, 2013

DIY Felt Play Food Bread


If you have a play kitchen, and you need some play food, bread is a necessity!  All kids like making sandwiches etc.  This is the easy, no sew, cheating way to make them (thats me) lol.
Note:if sewn instead of glued, would look nicer :)

Need:
construction paper
white felt
tan felt
hot glue gun and glue

Start by making a pattern
I drew my bread slice out on construction paper, and cut it out.


trace and cut 4 white bread shapes per slice, stack together


cut long skinny strips out of the tan


i made 4 slices. . . here are all my pieces


next, with 4 pieces of white stacked perfectly together, start, very carefully, glueing the tan strip (crust) around the bread

Note: if sewing, sew to top and bottom bread slice pieces


finished piece


tada!!  they feel real!


Saturday, December 29, 2012

DIY play food. . . felt food for our play kitchen!

Well the play kitchen is complete, and we needed some cute accessories to go in it.
Looking online i fell in love with felt food, mostly because it is hand made and cheap, and also because it looks real and is washable.

This is a list of the felt food (and accessories for the kitchen) that i have made.
My daughter LOVES them, when I handed her the green beans this morning she told me in her excited squeely girly voice (and i quote) "oh mom!, you can make any food look real!"

strawberries (tutorial here)


Fried Eggs


Bread


Strawberry Jam


I mixed craft paint and purple glitter and painted inside of smallest (clean dry) jam jar, to look like strawberry jam. . . I also cut out glops of "jam" from matching colored felt, that we keep inside the jar.
(i know. . . its glass. . . but she is 7, no, i wouldn't recommend keeping glass jars for toddlers ;))


the sandwich fixins to go with the bread.


yum!


her cookie jar


chocolate chip cookies


cheap shaker set (again glass) filled with old salt and old coffee grounds, cap filled with hot glue, then glued on. . . she can shake all she wants and nothing comes out!


my personal favoite:  Donuts
one each strawberry, chocolate and vanilla glaze


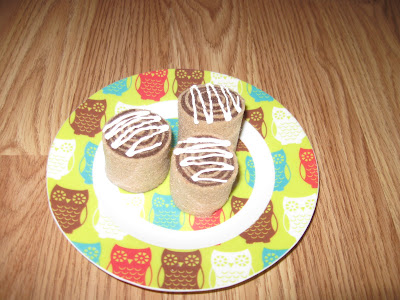
mini cinnamon rolls  (rolled up felt in tan and brown with white fabric paint (puff paint) on top)


Popsicles in the freezer 


I have kept all these for her, washed them well, and gave them to her.
All are miniature versions of the same we keep in our fridge at all times! lol

orange juice and mayo have been painted inside to look real


a cake with 4 slices (really hard to make without a pattern as i did, i recommend downloading a pattern)

i stuffed this like normal and it was bulky. . . so i had to add cardboard inside to keep its shape


 And last but not least. . . the green beans

i used a mini can of green beans (i have the fancy can opener that cuts under the edge so once cut open nothing is sharp:)


rolled up rectangles of green felt for the green beans and placed inside can


more tutorials to come!!! check back to see how i made a pretend play birthday cake they can decorate over and over!!

Thanks for stopping by!


DIY Felt Food . . . Carrot tutorial

Felt Carrots


Adorably realistic carrots, made of felt.


I drew these patterns out myself on construction paper (as always :) and cut the pieces out of felt.
You can very easily mimic my pattern seen below in yellow :)
one carrot piece and two leaf pieces for each carrot.

Sew lines on the leaves to resemble veins

 Trim the thread

fold stem part over, then over again (like rolled) and sew it up to leaf

my unperfectly perfect leaf :)
repeat for other leaf
 

sew little lines here and there on carrot piece to add real carrot texture
then trim loose threads
 
Next fold right sides together and sew carrot base together


turn carrot inside right. . . you should have these 3 pieces


stuff carrot (i use left over felt pieces diced up)
using embroidery floss, or doubled thread, sew a base stitch around top of carrot.  Do not cut or tie off yet!


Place leaf pieces inside carrott


Pull thread to gather top together


Once pulled very tight, tie it off, then sew back and forth thru the leaves a few times so they can not be pulled out


Repeat for each carrot you wish, and that is that. . . delicious looking carrots!